Bay & Openings
|
|
Bay & Openings |
Top Previous Next |
|
|
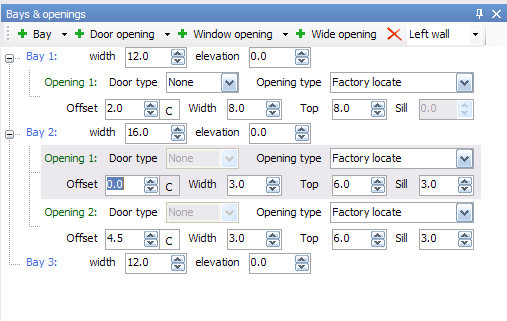
Select a Bay to edit by clicking on the blue label. The Bay will become highlighted with a gray box. To adjust the size of the Bay, use the arrows or key in the requested dimensions. The elevation measurement of a Bay allows for a permanent opening within that bay area.
Note: Bay elevation must be set to “0” for the addition of doors and windows.
To add a Bay, click the green “plus sign” next to the word "Bay" located in the blue bar directly above the Bay measurements.
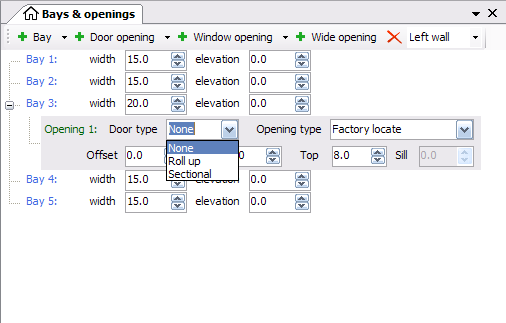
To add a door or window opening, first select the Bay for which the opening will be applied. The opening information will appear below the selected bay. Here you can select the type of door to be installed; type of opening required and edit the opening dimensions. Currently there are 3 choices:
Note: IQS typically designs around common headroom constraints per door type. Currently there are 4 choices:
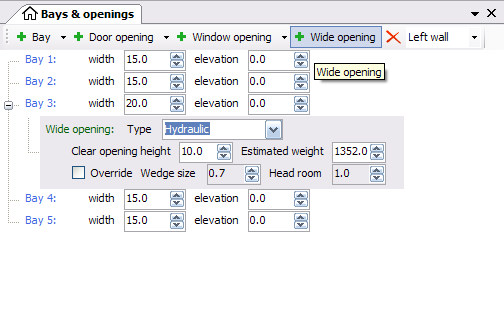
You can specify the location of the door by changing the offset location in the offset control. Click the C button to the right to center the opening within its available space in the bay. Width (Applies to all) You are able to specify the door width by adjusting the dimension in the width tab. Though it is not recommended, IQS will allow columns to be used for door jambs in the event the bay spacing is set properly to allow this. Normally a door can be placed in a bay and take up the entire width of that bay. Adjacent bays will have a minimum of 1 foot offset from the door edge. End wall corner columns will have 2 foot minimum edge clearance. See offset for more details on end wall corner minimum spacing. Top (Applies to all) You are able to specify the door or window height by adjusting the top dimension. Constraints are place on framed openings to accommodate most door types. Currently IQS requires a 2 foot minimum distance above the door. This distance is calculated to the nearest roof edge on sidewalls and to the underside of roof purlins on end walls. Normally slide doors located on end walls are no higher than the side wall eave height unless there is sufficient space to accommodate a horizontal path wide enough to create clearance to the nearest roof line. Note: please call your sales rep if you are unsure about slide door requirements. Sill (Window) You are able to specify the sill height of a window opening by adjusting the dimension in the sill control. Wide Opening (Large Door) To place a wide opening in an end wall (only) you must first adjust the end wall bay spacing to accommodate the door opening. Multiple wide openings can exist in each end wall, however we typically suggest a maximum of 3 wide openings per end wall with a collective opening width (per wall) of no more than 180 feet. We will use a single opening for our example of properly placing a wide opening in the end wall of a building. We will use a 70 foot wide building with a 50 foot wide (hangar) opening. There are 3 bays by default, therefore there is no need to remove any bays. If there were more than 3 bays, we would delete all but 3 for this example.
|
| © 2006-2008 ICON Buildings |